
How to Lubricate a Stand Mixer Gearbox?
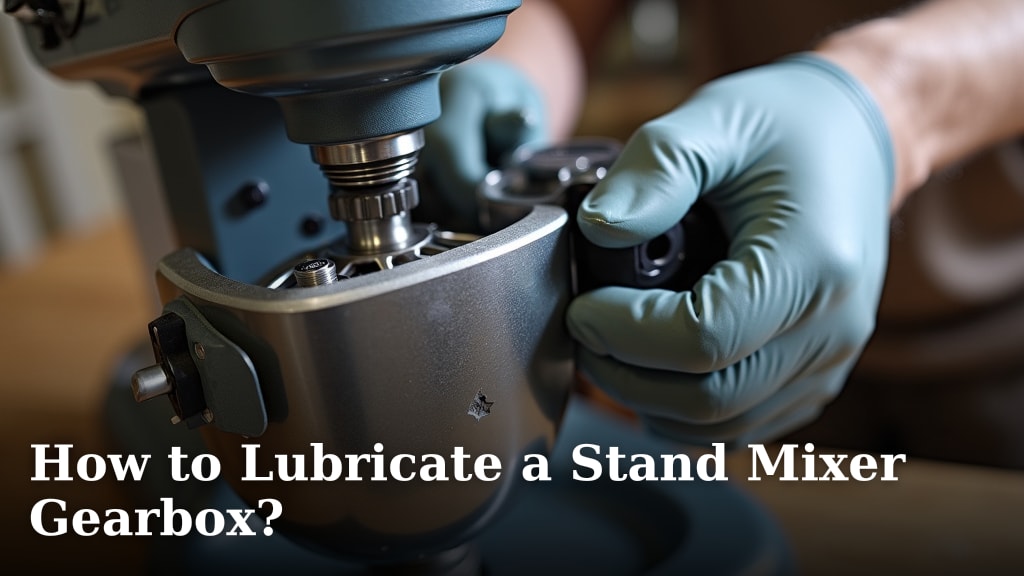
To lubricate your stand mixer’s gearbox, you should use a food-grade grease specifically designed for kitchen appliances. This ensures your mixer runs smoothly and safely. Applying the correct lubricant helps prevent wear and tear on internal gears, keeping your mixer in top shape for years of baking fun.
Your stand mixer’s gearbox is a vital component. It handles the tough jobs, like kneading dough. Over time, the original lubricant can dry out or become less effective. This can lead to noisy operation or even mechanical failure. Regular maintenance, including proper lubrication, is key to its longevity and performance.
TL;DR:
- Use food-grade grease for your stand mixer gearbox.
- This prevents internal gear wear and tear.
- Proper lubrication ensures smooth operation.
- It’s a key part of mixer maintenance.
- Check your manual for specific grease types.
Ready to give your stand mixer the TLC it deserves? Let’s walk through exactly how to lubricate its gearbox step by step.
Keeping Your Stand Mixer’s Gears Smooth
Your stand mixer’s gearbox is a workhorse. It takes on tough jobs like kneading bread dough. Over time, the original lubricant can dry out. This can lead to noise and damage. Properly lubricating the gearbox is essential. It ensures your mixer runs smoothly and lasts longer. This guide will help you keep your mixer in top shape.
Why Gearbox Lubrication Matters
Think of the gearbox as your mixer’s engine. Inside, metal gears mesh and turn. They need a good lubricant to move freely. Lubricant reduces friction. This prevents gears from grinding against each other. Grinding causes wear. It can make your mixer noisy. It can also lead to costly repairs.
The Role of Lubricant
Lubricant has a few key jobs. It reduces friction between moving parts. It also helps dissipate heat. This keeps the gears from overheating. Lubricant also acts as a barrier. It protects gears from dust and debris. Without it, metal-on-metal contact causes damage. This is why choosing the right lubricant is important.
Signs Your Mixer Needs Lubrication
How do you know if your mixer’s gearbox needs attention? Listen to your machine. Is it making new or louder noises? Grinding or whining sounds are red flags. You might also notice the mixer running slower. Or it might struggle with tasks it used to handle easily. Sometimes, you might even see grease leaking from the head. These are all signs it’s time to lubricate.
Choosing the Right Lubricant
Not just any grease will do. Your stand mixer’s gearbox needs a special kind of lubricant. It must be food-grade. This is vital because the gearbox is close to your food. You don’t want non-food-safe chemicals getting into your ingredients. Many manufacturers recommend a specific type of grease.
Food-Grade Grease Explained
Food-grade grease is safe for incidental food contact. This means if a tiny bit were to accidentally touch your food, it wouldn’t be harmful. It’s designed for kitchen equipment. Look for labels that state “food-grade” or “NSF H1 certified.” NSF International is an organization that certifies products for safety.
What Type of Grease to Use?
Many stand mixer brands, like KitchenAid, use a specific type of grease. It’s often a white, viscous lithium-based grease. It’s formulated for high-speed, low-temperature applications. You can usually find this specialized grease online. Check your mixer’s manual for the exact recommendation. Some sources suggest a white lithium grease is suitable. However, always confirm it’s food-grade.
Where to Buy Gearbox Grease
You can often buy stand mixer gearbox grease from the manufacturer’s website. Online retailers like Amazon also carry it. Look for brands that specialize in appliance repair parts. Ensure the product description clearly states “food-grade” or “NSF H1 certified.” This is the most important detail.
Grease vs. Oil: What’s the Difference?
While some machines use oil, stand mixer gearboxes typically use grease. Grease is thicker than oil. It stays in place better within the gearbox. Oil can easily drip out. Grease provides a longer-lasting film of lubrication. It’s also better at sealing out contaminants. For most stand mixers, grease is the correct choice.
| Lubricant Type | Typical Use | Food-Grade? | Why It Works for Gearboxes |
|---|---|---|---|
| Food-Grade Grease | Stand Mixer Gearboxes | Yes | Stays in place, protects gears, safe for food contact. |
| Regular Grease | Car Parts, General Machinery | No | Not safe for kitchen use, may damage mixer. |
| Light Machine Oil | Sewing Machines, Small Motors | Sometimes | Too thin for gearbox, will likely leak out. |
Step-by-Step Guide to Lubricating Your Mixer’s Gearbox
Lubricating your mixer’s gearbox can seem daunting. But with careful steps, you can do it yourself. This process typically involves disassembling the mixer head. It’s not a quick job, so set aside some time. Always unplug your mixer before starting any maintenance. Safety first!
Gather Your Supplies
Before you begin, make sure you have everything. You’ll need your food-grade gearbox grease. A set of screwdrivers is essential. You might need a socket set or Allen wrenches too. Have some paper towels or shop rags handy for cleanup. A small brush can help clean old grease. Some people use a putty knife or plastic scraper.
Tools You Might Need
- Food-grade stand mixer grease
- Screwdrivers (Phillips and flathead)
- Socket set or Allen wrenches (check your model)
- Putty knife or plastic scraper
- Paper towels or shop rags
- Small brush (optional, for cleaning)
- Gloves (optional, to keep hands clean)
Disassembling the Mixer Head
The exact disassembly varies by model. Consult your mixer’s manual. Generally, you’ll start by removing the top cover. This usually involves unscrewing a few screws. Sometimes there are clips. Once the cover is off, you’ll see the internal workings. The gearbox is typically at the bottom of the head. You might need to remove a bottom plate or housing.
Accessing the Gears
You need to get to the gears themselves. This often means removing the planetary assembly. This is the part where your attachments connect. It might twist or lift out. Be gentle. Take pictures as you go. This helps you remember how to put it back together. Note the orientation of any removed parts.
Cleaning Out Old Grease
Once you can see the gears, you’ll notice old grease. It might look dark or gunky. Use your scraper and rags to remove as much of it as possible. Pay attention to the spaces between gear teeth. A clean surface is crucial for the new grease to work effectively. If the old grease is very hardened, you might need a mild degreaser. Ensure it’s safe for metal and plastic parts.
Applying New Grease
Now for the main event. Apply a generous amount of fresh, food-grade grease. You want to coat all the gear teeth. Don’t be shy with it. The gears need ample lubrication to function properly. You can use your finger or a small brush. Make sure to get grease into all the nooks and crannies. A thin layer isn’t enough here. Think of it like greasing a cast iron pan generously.
How Much Grease?
It’s hard to give an exact amount. You want a visible coating on all moving gear surfaces. Some recommend filling about 1/3 to 1/2 of the available space within the gearbox housing. It’s better to have a little too much than too little. Excess grease will likely be pushed out during operation. Your manual may offer a specific volume recommendation. If not, aim for a thorough, even coating.
Reassembling Your Mixer
Putting your mixer back together is the reverse of taking it apart. Carefully reinsert the planetary assembly. Make sure it clicks or locks into place correctly. Replace any covers or plates you removed. Secure all screws firmly. Double-check that nothing is loose. Reassemble methodically.
Testing the Mixer
Before you tackle a big baking project, test your mixer. Plug it in. Turn it on at a low speed. Listen carefully. The noise should be significantly reduced. The mixer should run smoothly. Let it run for a minute or two. If you hear any strange noises, unplug it immediately. You may need to recheck your assembly or grease application.
How Often Should You Lubricate?
The frequency of lubrication depends on use. If you use your stand mixer often, you might need to do it annually. For lighter use, every 2-3 years could be sufficient. Many experts suggest checking the lubricant every year or so. Look for signs of dryness or degradation. Your mixer’s manual might provide a maintenance schedule. It’s better to lubricate too often than not often enough.
Consulting Your Manual is Key
Your stand mixer’s manual is your best friend. It contains specific details for your model. It will often tell you the exact type of grease to use. It might also have diagrams for disassembly. If you’ve lost your manual, you can usually find a PDF version online by searching your mixer’s model number.
A Quick Lubrication Checklist
- Unplug the mixer before starting.
- Use only food-grade grease.
- Disassemble carefully, noting screw locations.
- Clean out all old grease thoroughly.
- Apply a generous, even coat of new grease.
- Reassemble carefully and test at low speed.
Conclusion
You’ve learned how essential proper lubrication is for your stand mixer’s gearbox. By using the right food-grade grease and following a careful step-by-step process, you can keep your mixer running smoothly for years. Don’t let a noisy or struggling mixer slow down your baking. Take a moment to gather your supplies, consult your manual, and give your mixer the maintenance it deserves. Your next batch of cookies will thank you!
Frequently Asked Questions
Can I use regular grease on my stand mixer gearbox?
No, you should never use regular grease on your stand mixer’s gearbox. It must be food-grade grease to prevent contamination of your food. Regular grease is not formulated for kitchen appliances and could be harmful.
What happens if I don’t lubricate my stand mixer’s gearbox?
If you don’t lubricate your stand mixer’s gearbox, the internal gears will experience increased friction and wear. This can lead to grinding noises, reduced performance, and eventually, costly mechanical failure.
How do I find out which specific grease my stand mixer needs?
Your stand mixer’s owner’s manual is the best place to find specific grease recommendations. If you don’t have the manual, search online for your mixer’s model number, and you should be able to find a PDF version with this information.
Is it okay if a little bit of grease gets on my food?
That’s precisely why you need food-grade grease. If a small, incidental amount of food-grade grease were to get into your food, it is formulated to be safe. However, the goal is always to prevent any grease from contacting your ingredients.
How much grease should I put in the gearbox?
You want to apply a generous, even coating to all the gear teeth. Aim to fill about one-third to one-half of the available space within the gearbox housing, ensuring all moving surfaces are well-covered. It’s generally better to use a bit more than too little.
